Elementor Customization of Cart & Checkout Pages for WooCommerce
David Mainayar on | 8 min read
Are you looking for a way to customize your WooCommerce checkout page within Elementor?
The checkout page on your WooCommerce site is the last chance for customers to decide whether or not they want to make a purchase from your store. This is one of the main reasons why it’s extremely important that you ensure it is easily navigable and simple.
If you're one of the 2 million website owners using Elementor, you have a lot of room to create a well-designed, highly converting checkout page. There are many plugins and tools that give you more control over the look and feel of your WooCommerce cart page. As a result, you enhance the overall shopping experience on your website and help customers checkout quicker. A quicker checkout means more sales for your business.
In this tutorial, we’ll take a look at how you can customize the WooCommerce cart and checkout pages in Elementor. We’ll also show you how to take your checkout one step forward and create a direct checkout using PeachPay and the PeachPay widget.
Why should you customize your cart and checkout pages?
Along with having a stunning website design, it’s important to customize your ecommerce site to meet the needs of your customers as much as possible. If that’s not the case with your online store, customers will likely end up losing interest, abandoning their purchases, and buying somewhere else.
For instance, if the checkout process is lengthy, customers who want to quickly purchase one or two items will likely end up leaving them in the shopping cart and bouncing off your online store for good. However, if you offer an easy checkout that quickly lets customers purchase products with a few clicks, there’s a high chance more people will be willing to shop from your store rather than from your competitors.
Since the checkout page is one of the most used parts of your website, it’s important to make sure customers can navigate swiftly through there. Customizing your checkout process and making it quicker not only helps increase sales but also improves customer retention for your business.
Let’s take a look at some other benefits of customizing the default checkout process in Elementor and setting up a direct checkout instead:
-
Reduce cart abandonment. The quicker it is to check out from your WooCommerce store, the more likely customers will be to stay on your site and complete checkout. By implementing a direct or “express” checkout on your online store, you reduce cart abandonment and encourage more people to purchase from you.
-
Improve customer experience and navigation. Instead of using the default checkout process where the customer has to jump around multiple pages, using a direct checkout can help improve the user experience and make it easier to navigate your online store.
-
Remove barriers between product interest and purchase. If you let customers checkout directly from product pages, you will see an increase in the number of products sold. This is because removing the default checkout page essentially removes all barriers between product interest and purchase. Once the customer finds the product they need, they can quickly buy it from the same page instead of going to a new page.
-
Encourage customers to make faster purchases. You want customers to quickly purchase products from your store. This reduces the chance of them “second-guessing” their purchase or getting distracted by other content on your website.
-
Improve your sales and revenue. Setting up a direct checkout process on your online store is one of the best ways to boost your sales and generate more revenue for your business.
How can you customize your checkout page in Elementor
Elementor by default offers a lot of customization options for the checkout page of your online store.
For instance, you can customize the cart widget, change the column layout, set desired colors and typography, customize cart button texts, set payment methods, and customize the cart total on your online store.
Let’s take a look at how you can do this in Elementor Pro:
Start off by getting the Elementor Pro page builder plugin and installing it on your WooCommerce site.

You can replace the default shortcode in Elementor’s cart page with the new Cart widget.
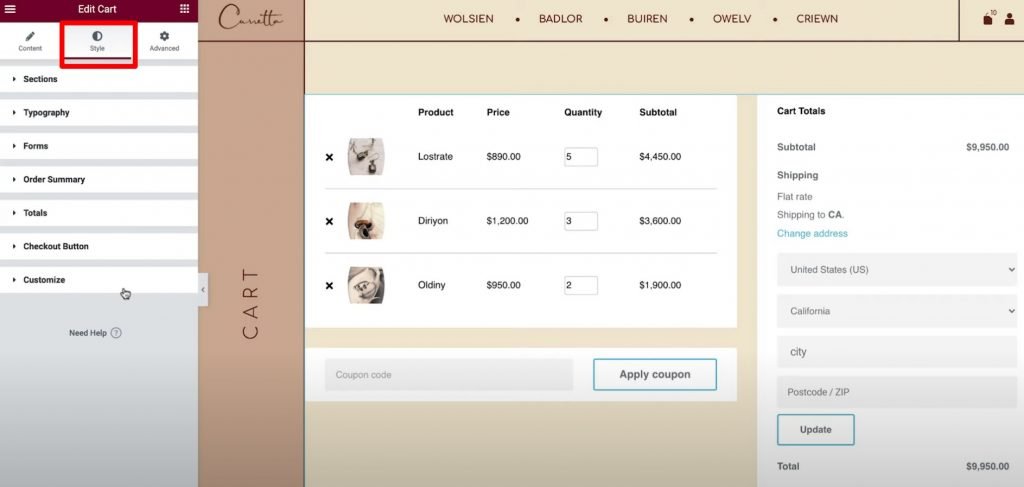
Once that’s done, you can open its settings in the sidebar to set up its layout, colors, typography, and more.
Introducing the PeachPay Elementor widget
Using the PeachPay widget, store owners can easily connect Elementor Pro to PeachPay.
Take your checkout one steps further: create a direct checkout using PeachPay and the PeachPay widget
Using the PeachPay plugin, you can create a direct checkout on your online store. This way, you make the checkout process on your site seamless. As a result, it can help increase sales, the average order value and reduce cart abandonment for your online shop. For a better understanding of how to customize WooCommerce checkout fields for your online shop, you can go over our guide on customizing checkout fields with WooCommerce.
Instead of offering a checkout page, PeachPay lets you offer customers a modern way to check out – the checkout window. You can fully customize the checkout window according to your brand’s requirements (including colors and typography) and let customers quickly checkout with a single click.
PeachPay lets your customers skip the cart page
PeachPay is essentially a direct checkout plugin that reduces cart abandonment by letting customers quickly checkout their order directly from the cart “window”.

Once the customer is done adding products to their shopping cart, they can click on the mini-cart widget and checkout directly from there. In addition to this, repeat customers will be able to check out much quicker than first-time customers.
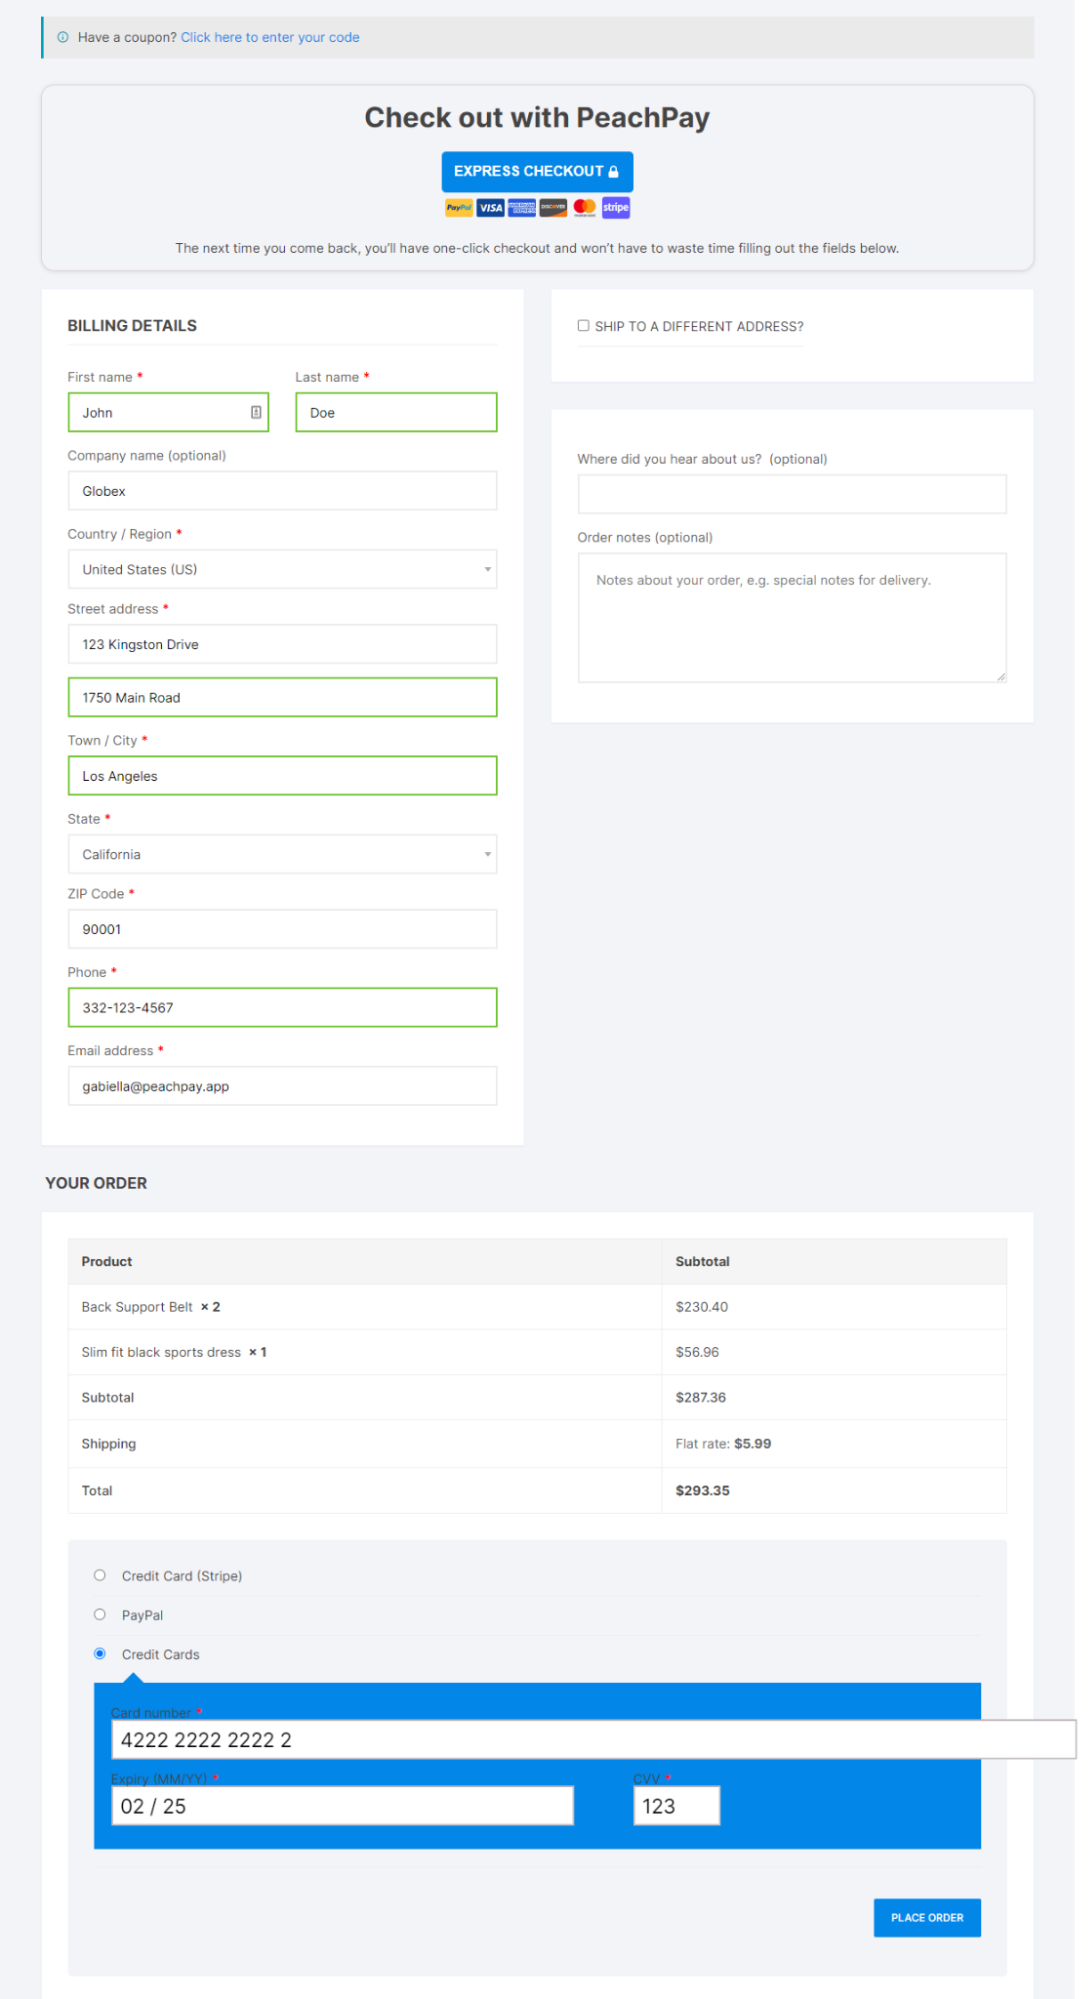
Repeat customers can select the “Express Checkout” option that lets them quickly checkout by using the saved billing and payment information from previous purchases. A quicker checkout on your online store means more sales and helps generate more revenue for your business.
PeachPay makes it easier to offer multiple payment options on your online shop
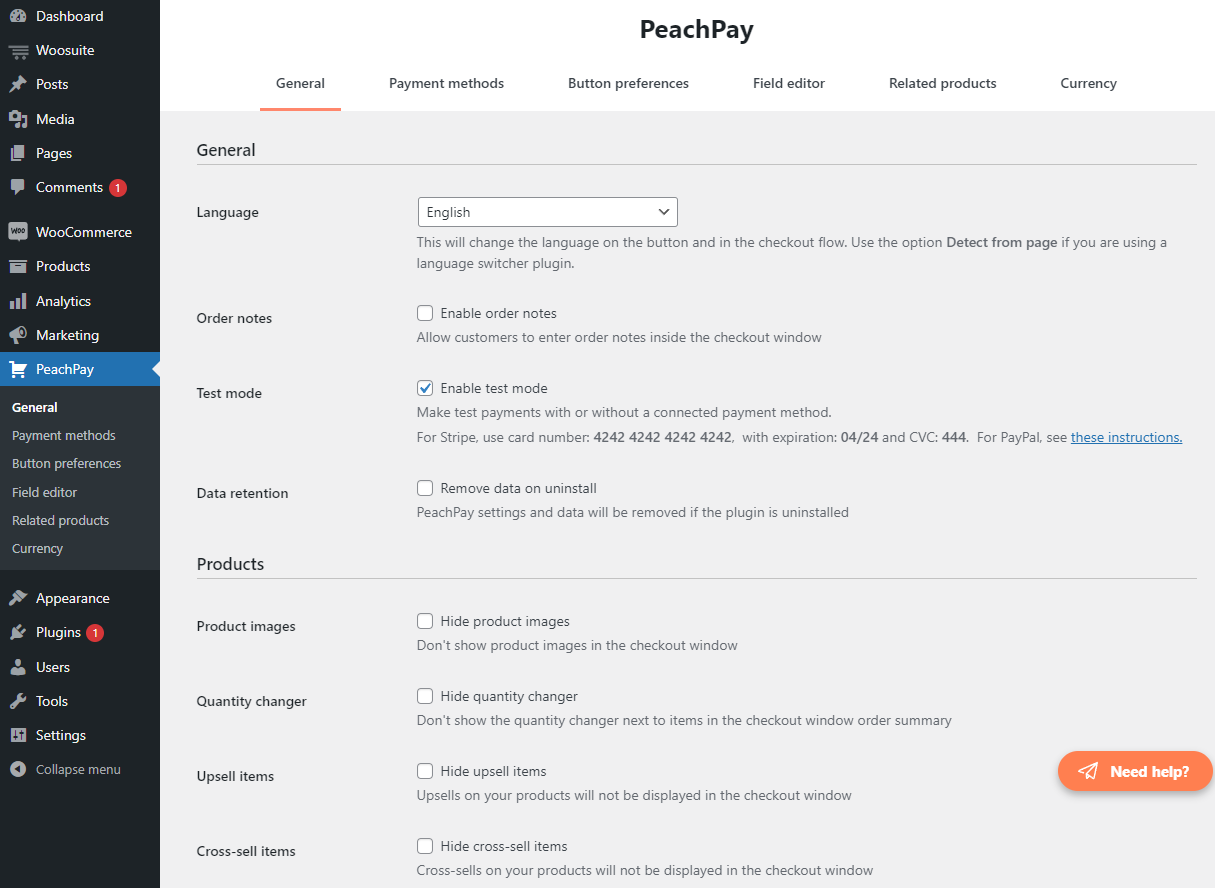
PeachPay comes built-in with multiple payment options including PayPal & Stripe.
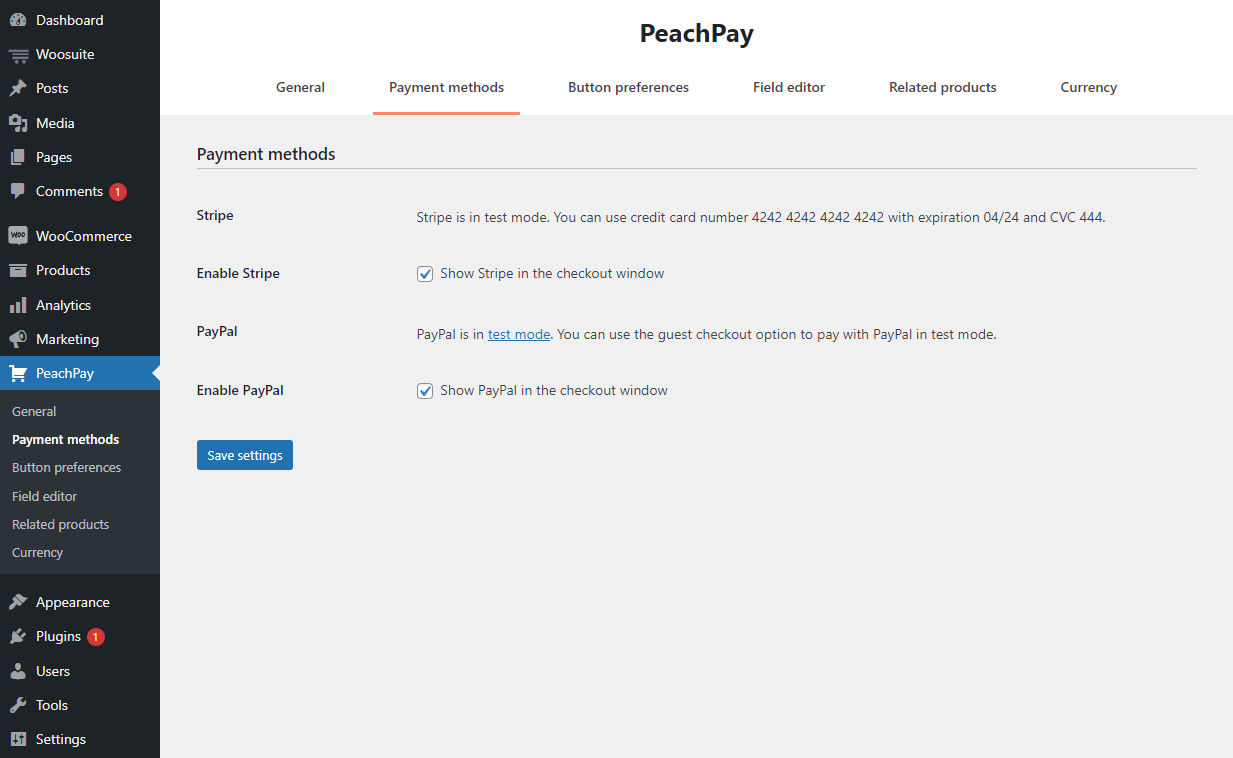
You can enable them by navigating to PeachPay → Payment methods from the WordPress admin panel and selecting the Enable Stripe checkbox. Make sure to click on the Save settings button to save changes on the front-end.
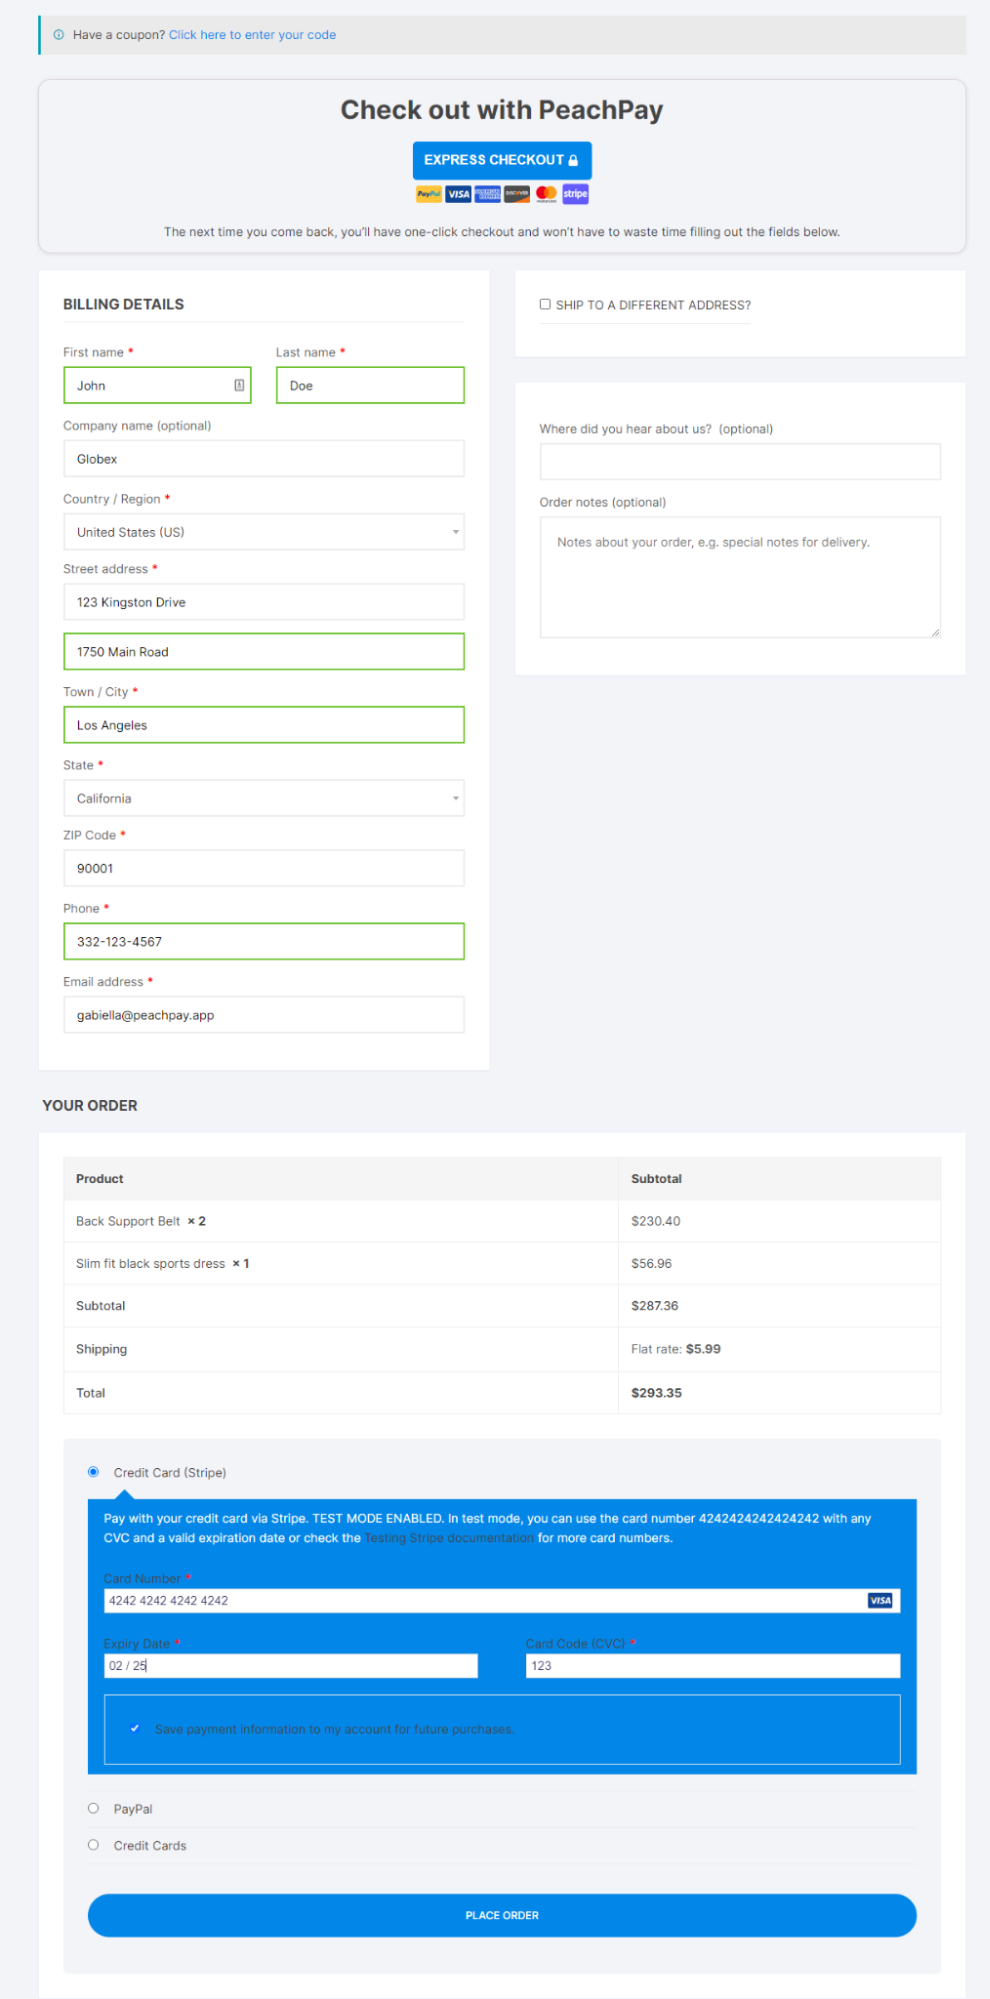
PeachPay is built on top of Stripe and works seamlessly with the payment processor for receiving payments from your customers. You have access to advanced features including fraud protection, instant payouts, and easy payment management through the Stripe dashboard.
It also features popular payment processors such as Apple Pay and Google Pay. Plus, there are many more to come including Klarna, AfterPay, and AliPay. However, PeachPay doesn’t support any types of cryptocurrencies payments.
Another great thing about PeachPay is that it also integrates perfectly with PayPal. This way, you can offer your customers all payment methods so that it’s easier for them to pay with whatever method they like, using the PeachPay integration. This helps enhance the shopping experience on your e-commerce store and is a great way to encourage more sales for your business.
To enable PayPal payments in PeachPay, make sure to enable the Enable PayPal checkbox from the same PeachPay → Payment methods menu.
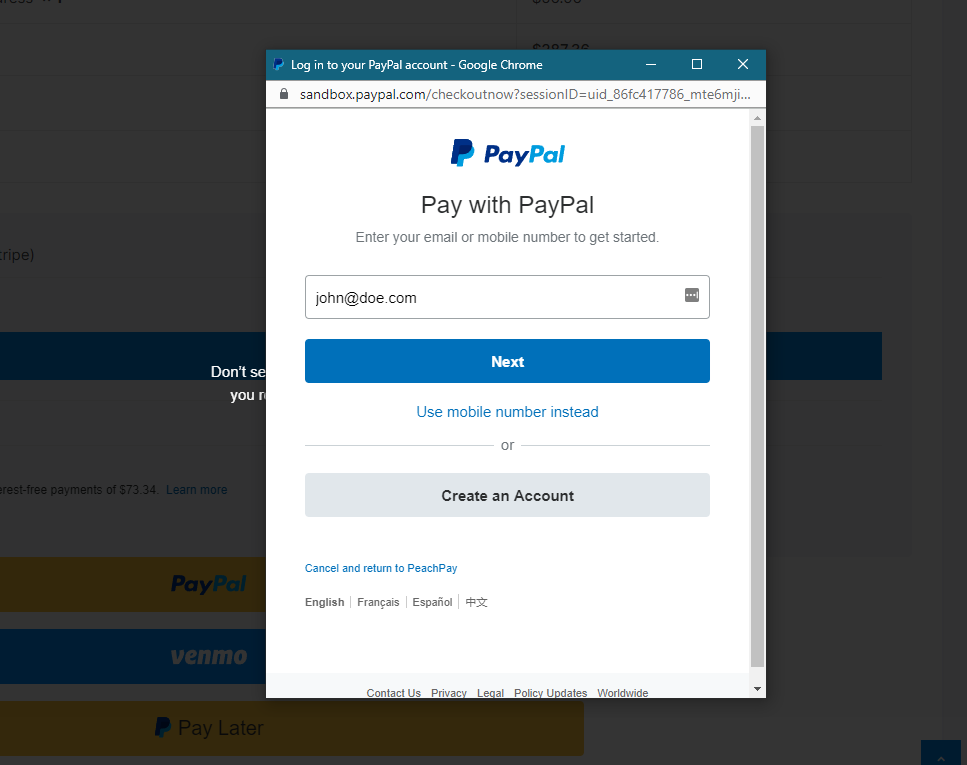
This lets your customers enter their PayPal information and quickly pay for their order using the PayPal account page in a new window.
PeachPay offers a “one-off” solution for completely overhauling the checkout experience
Other than offering extensive features to speed up the checkout flow of your online store, PeachPay is also the perfect solution for completely overhauling the checkout experience.
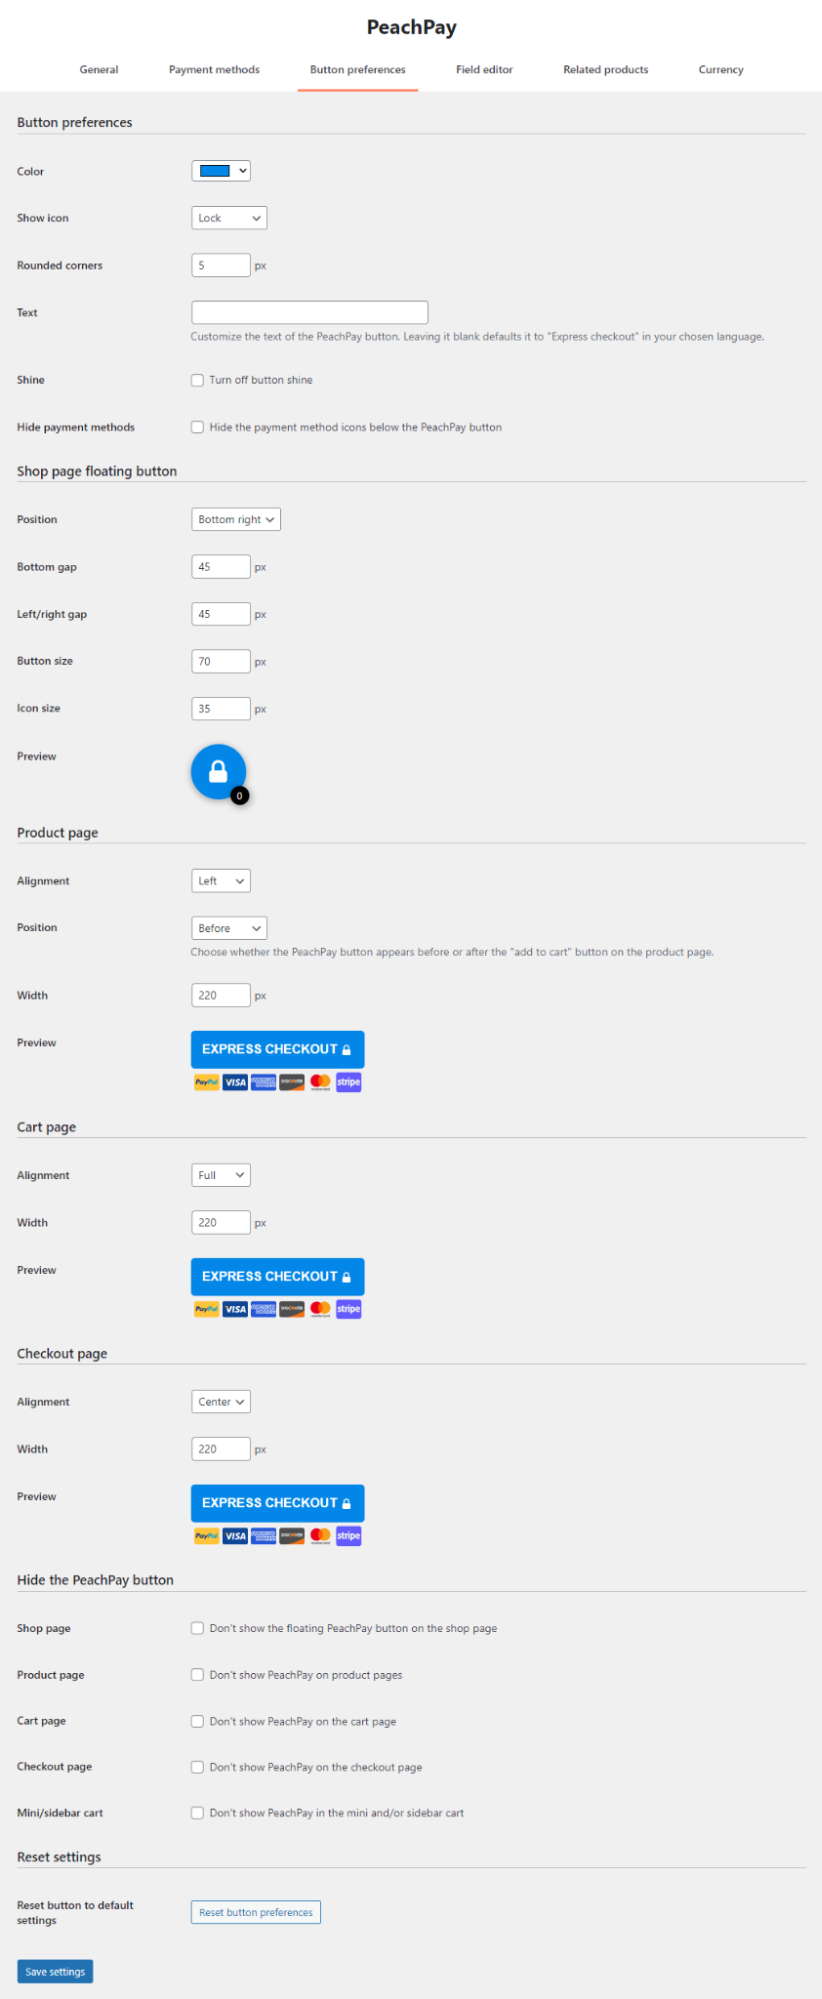
With that being said, PeachPay lets you customize most aspects of your checkout such as the option to set button colors, text, and style. To do this on the back-end, navigate to PeachPay → Button preferences to view all customization options.
Here, you can customize how the “Express Checkout” button will look on the front-end of your store. You can set the background color using the Color dropdown menu, the icon type using the Show icon dropdown menu, and set rounded corners for the button using the Rounded corners field. In addition to this, you can also input custom text to the “Express Checkout” button using the Text field.
Another great thing about PeachPay is that it lets you customize how the one-click checkout button looks on all shop pages including the Single Product page, Cart page, and the Checkout page.
Other than how the button looks on the checkout page, PeachPay also lets you add additional fields to the checkout page. This is useful for gathering more information from the customer once they checkout with their order. Navigate to PeachPay → Field editor from the WordPress dashboard to add additional fields to your checkout.
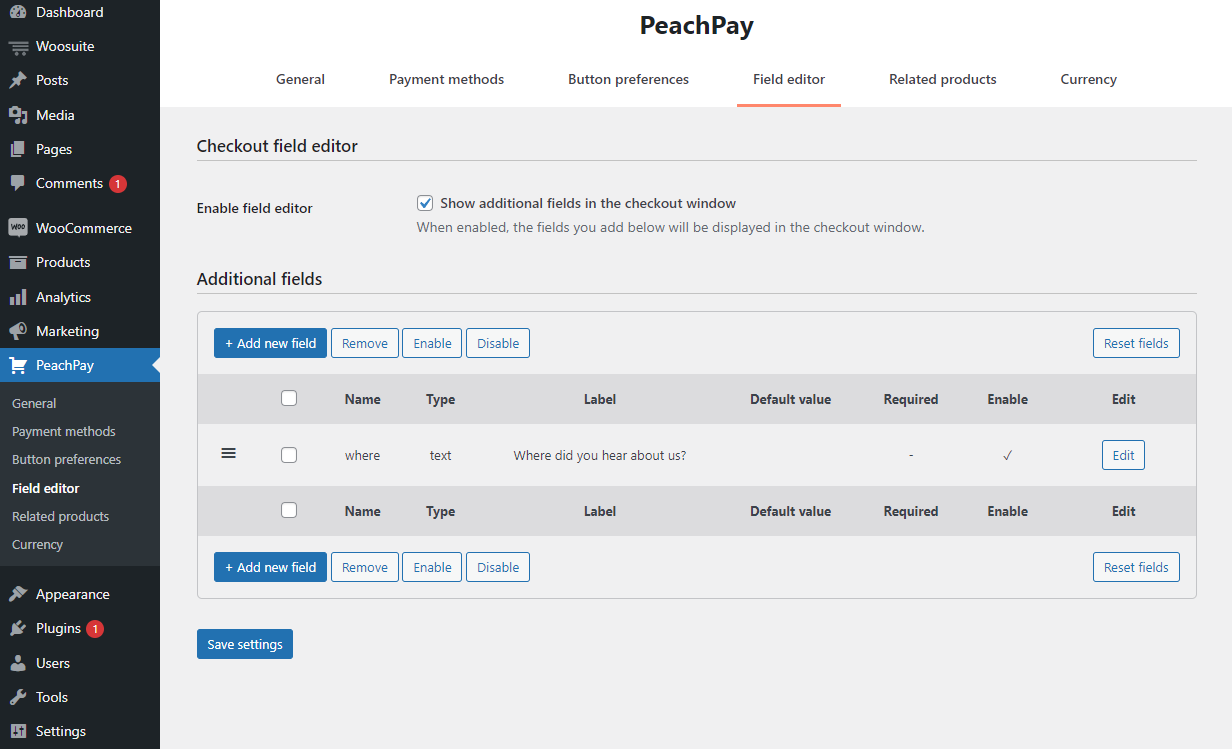
Click on the + Add new field button and set field details. Also, make sure to select the Enable field editor checkbox and click on the Save settings for it to take effect on the front-end.
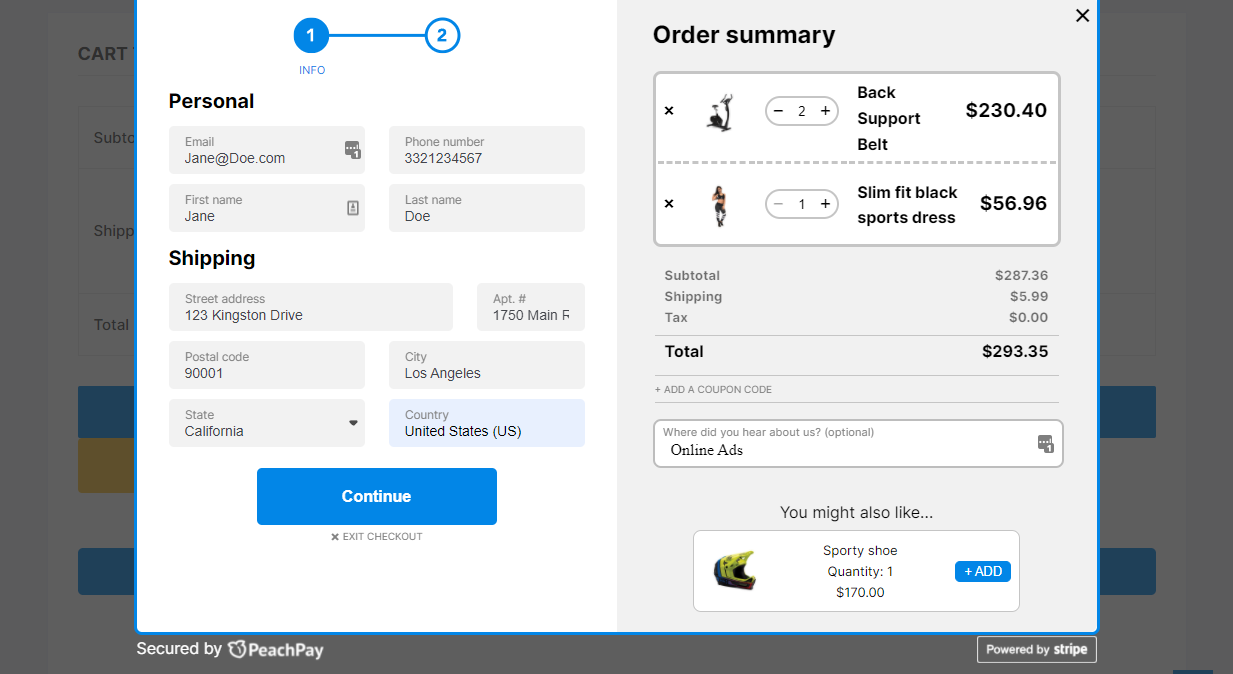
Customers can checkout using the cart window that displays all additional fields, coupon and discount fields, cross-sells and upsell products, as well as product images all in the same window. This not only helps make it easier for customers to quickly checkout but also helps make your online store look more unique and professional. Plus, customers can update cart items if they’d like.
PeachPay is designed for all types of users, even non-tech savvy ones
The best part about PeachPay is that it’s designed for all types of users, even people who don’t know how to code. All you need to do is install the plugin on your WordPress site and let PeachPay handle the rest for you.
With just a few clicks, you can set up a “one-click” checkout experience on your online store and personalize cart buttons and fields easily, all from the WordPress admin panel, an interface most people are familiar with. This is the perfect solution for all types of business owners, even non-tech savvy ones who are looking for a robust, trouble-free payment solution for their online store.
The PeachPay mobile app keeps your customers at ease
That’s not all when it comes to the functionality on offer with PeachPay. Your customers also have access to the PeachPay mobile app that lets them track all orders history, keep an eye on item or order tracking, and offers basic account management features.
This not only helps keep your customers’ personal information secured but also encourages more people to shop from your online store.
Connect your favorite PeachPay tools with Elementor
If you’re using the Elementor page builder, you can also connect your favorite PeachPay tools using the PeachPay widget.
The PeachPay widget is a limited version of PeachPay that is fully compatible with the Elementor page builder. You can access the PeachPay widget once you have the Elementor page builder and the PeachPay plugin installed on your WordPress site.
However, if you’re looking for full customization features and abilities, you will need to use the PeachPay plugin and its settings page.
A case study to explain how PeachPay improves your business
Let’s take a look at how other businesses have used PeachPay to improve their business and take profits to the next level.
MinifigWorks is a LEGO product arbitrage company that was performing quite well by selling heavily discounted LEGO products. Conard Belknap, the owner of MinifigWorks was not a stranger to the default multi-step checkout process and cart abandonment as a consequence.
Conard Belknap learned about PeachPay and the built-in integrations it comes with. Within only one month of PeachPay use, MinifigWorks saw their conversion rate increase by a whopping 72%.
This case study is a great example of how PeachPay helps take your already successful running business to the next level. You can boost growth by reducing cart abandonment and discovering new heights for your business.
It also shows how PeachPay gives business owners the leverage to focus on other aspects of their businesses instead of worrying about quick payments and checkout. The quicker checkout experience is all thanks to PeachPay’s “checkout window” which is far better than a traditional checkout page. This way, you can offer your customers to checkout within a few clicks anywhere from your website, whether they’re browsing products or reading an article on your site.
For a more detailed study on how MinifigWorks took its operations to the next level with PeachPay, you can go over this customer story about PeachPay.
Get started with PeachPay
It’s easy to get started with PeachPay and offer a better checkout to your customers. PeachPay is not only intuitive but works seamlessly for all sizes of stores and even with a popular WooCommerce builder such as Elementor.
The easier you make it for your customers to navigate through the cart and checkout pages, the better the chances are of attracting new shoppers and reducing cart abandonment on your online store. If your customers can check out without any delays, it reduces any chance of them abandoning their cart and bouncing off your shop only to purchase the same products somewhere else.
By implementing a “one-click” checkout experience using PeachPay, you can prevent customers from abandoning their cart which, in turn, helps your business generate more revenue and improve customer retention. We explained how to do this in our tutorial and, hopefully, you’re in a good position now to take the next steps.
Ready to take your checkout one step further and reduce cart abandonment? Get PeachPay today!